How to Start a YouTube Channel From Scratch
This year has undoubtedly shifted how entrepreneurs everywhere run their businesses, myself included. 2020 will go down in the record books as one of the most economically challenging years for millennials as we struggle to stay afloat during such uncertain times.
As I sat down and determined how I could pivot my influencer career during the COVID-19 outbreak, I set up a few actionable goals for myself to achieve by the end of this wild year. For example, I wanted to hit over 50K followers on Instagram which I’ve already checked off my to-do list. Another massive goal on my list? Starting a YouTube Channel from Scratch.
How to Start a YouTube Channel From Scratch: My Story
Creating and running a YouTube channel has actually been on my list of things to do for 2 years now. However, as much as I love creating blog posts and uploading them for the Internet to see, something about video content made me hesitant to start. My fears about YouTube ultimately prevented me from ever uploading a single video.
As much as I know plenty about capturing high-quality photos and editing them for Instagram, I know next to nothing about video content for YouTube.
How could I upload and edit good videos to my YouTube channel? What types of YouTube videos are successful? What niche should I enter as a YouTuber? What camera performs well to record video? Do I need to invest in studio lights?
Why I Finally Published My First YOUTUBE VIDEO!
My head feels like it’s spinning right now as I type out all of those questions I asked myself countless times before. Since 2020 has slowed down my influencer business to an extent with brands cutting back on their marketing budgets, I decided to finally make the leap into the world of YouTube.
Thankfully, I did some research prior to filming my first YouTube video and I figured out what tools I needed to jump right in.
Today I am going to share these tools and some helpful tips on how to start a YouTube channel from scratch. I have a lot of first-hand information to share because I just started my channel from scratch a few months ago!
Curious to find out how to start a YouTube channel from scratch? Read on, my friend!
How to Pick The Right Niche for Your Channel
First, you need to establish what type of content you want to upload to YouTube! My fashion niche carries over across all of my social media platforms, so choosing that as my main niche felt natural. However, I know not everyone has a fashion blog and will upload videos around this topic.
Are you struggling to find an interesting niche to pick for your channel? Go visit Google Trends to look up different topics to see which ones are gaining popularity this year.
You want to pick something that’s popular on Google Trends and one that you have a lot to say about. Work on brainstorming and listing out some potential video ideas for this popular topic you found on Google Trends.
The Best Equipment for a YouTube Channel
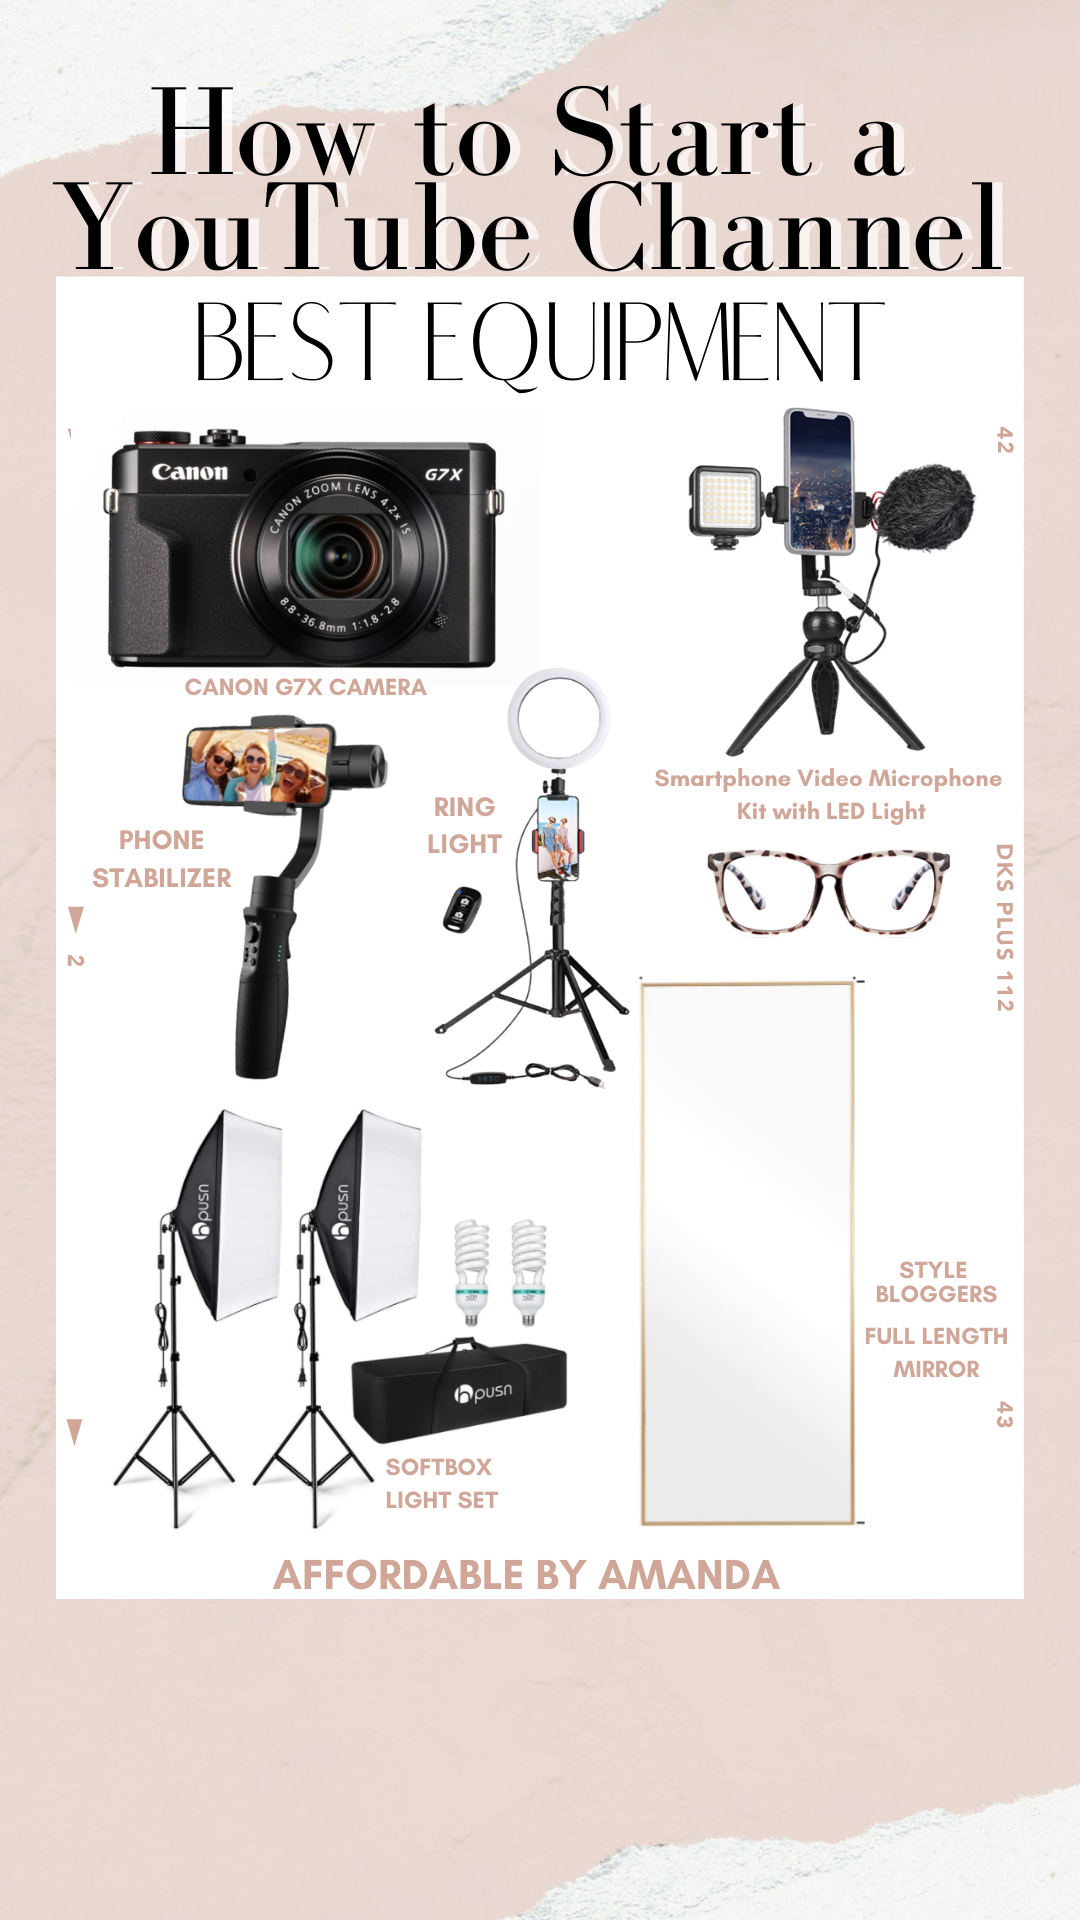
shop the best equipment for youtube
The Best Equipment for Filming YouTube Videos for Your Channel From Scratch
Canon PowerShot G7 X Mark II Digital Camera
One of the most popular cameras for YouTube is the Canon PowerShot G7 X line. Over on Amazon, you can find this Canon camera favorite packed together with a couple more “starter” items for any video beginner.
Sony ZV-1 Camera for Content Creators
Another camera option for content creators comes from Sony. This latest installment from Sony has a flip-out screen so you can watch yourself in the viewfinder as you record content.
I am interested in upgrading my own camera gear once I get the ball rolling on my YouTube channel, but that’s at least a year down the road. What’s great about the Sony ZV-1 Camera is the image stabilization, fast hybrid focus, on-board mic, and auto exposure. Talk about some impressive stats!
Smartphone Video Microphone Kit with LED Light
You don’t necessarily need to invest in a brand new camera to start a YouTube channel these days. With iPhones continuing to release 4K video recording capabilities and powerful processors, you can definitely use your phone to record a video.
For my first two videos, I uploaded the first one with footage from my camera and the next one with footage from my iPhone 8 Plus. Honestly speaking, I noticed the footage looking obviously sharper with my camera.
However, once I watched my second video, the footage looked similar enough in quality because I filmed in 4K. I will most likely use my camera to film sit down videos because it’s so bulky. For now, I plan on sticking with my iPhone for detailed shots of my outfits.
If you want to film a YouTube video on your iPhone I also recommend checking out a smartphone video microphone kit with LED light.
This handheld device features an LED light which will instantly make your footage look brighter. This kit from Amazon also includes a microphone for better audio and a tripod to steady your video footage.
3-Axis Gimbal Stabilizer for iPhone
As I continue to film YouTube videos with my iPhone, I’m using a gimbal stabilizer from Amazon to help me achieve flawless footage. Of course, with any new technology find, there’s a huge learning curve involved!
click [+] to shop each product
shop the best equipment for youtube
I’ve had my gimbal stabilizer with me for a little over a week now and I still don’t fully understand how to operate it.
Thankfully, YouTube has plenty of in-depth tutorials to explain how to set up the gimbal stabilizer!
It’s a simple tool for filming my outfits because I snap my phone into place and record my footage in a horizontal angle that’s ideal for YouTube content. I set up my phone to record my video horizontally and the gimbal stabilizer moves with my hand in one motion.
Ring Light with Expandable Tripod
In addition to a gimbal stabilizer device, you should also invest in ring light for extra bright footage. Why do YouTube videos with ring lights perform better? Well, it’s because the entire video looks brighter, clearer, and sharper with help from ring lights.
Set yourself up for success by purchasing a ring light or ring light set. I have a ring light with an expandable tripod which also helps me record Instagram reels! It’s been a great tool to have in my home office space for my content creating process.
Most of the top YouTube creators out there rely on ring lights for extra LED light. LED light, also known as key light, is the best lighting to record videos in. Ring lights ensure that you create a shadowless look and focus on creating an even light all across the face.
shop the best equipment for youtube
Softbox Lighting Kit Photography Studio Light 20″X28″
Ring lights are just one method to create beautiful lighting in the space where you plan on recording video. I’d start out using a ring light before steeping into softbox territory, but I do want to talk about the perks of using softboxes.
If you already own and love using ring lights, why not step it up a notch and order a softbox lighting kit to elevate your video quality?
Buying a softbox lighting kit can create professional quality results for your videos. I just ordered myself this exact softbox lighting kit so I will report back on how it works after I’ve filmed a video with this setup. I plan on setting up my softbox lighting kit in my office space to film my try-on hauls in the upcoming weeks.
Full-Length Mirror
After discussing lighting options to brighten up the quality of your YouTube video, I want to quickly mention an optional purchase. If you are entering the styling/fashion niche, I recommend investing in a full-length mirror to assist in recording fashion videos.
Since this is my niche on YouTube, I own a full-length mirror which helps me showcase each outfit I want to talk about in my videos. Some full-length mirrors on Amazon do the trick.
You can also wait to see if you can find a full-length mirror at your local HomeGoods, too. Full-length mirrors are completely optional for YouTube videos depending on your niche!
How to Film and Edit Your First YouTube Video
Best Camera Settings
Set your camera to the “movie” icon to begin filming footage. On my Sony A6000, I set my camera to film in MP4 format. If I invest in a better memory card I can eventually change my settings up to AVCHD, but for now, I shoot in MP4. Capturing video footage in MP4 format is an easier, faster way to upload and edit.
Best iPhone Settings
- Go to “Settings”
- Click on “Camera”
- Change settings under “Record Video” to 4K at 60 fps
- Record your YouTube video in a horizontal position
No matter what device you choose to record your first YouTube video with, be certain to double-check your settings each time you turn on your device. Record your footage and move on to the next step: editing your first YouTube video.
How to Edit Your First YouTube Video
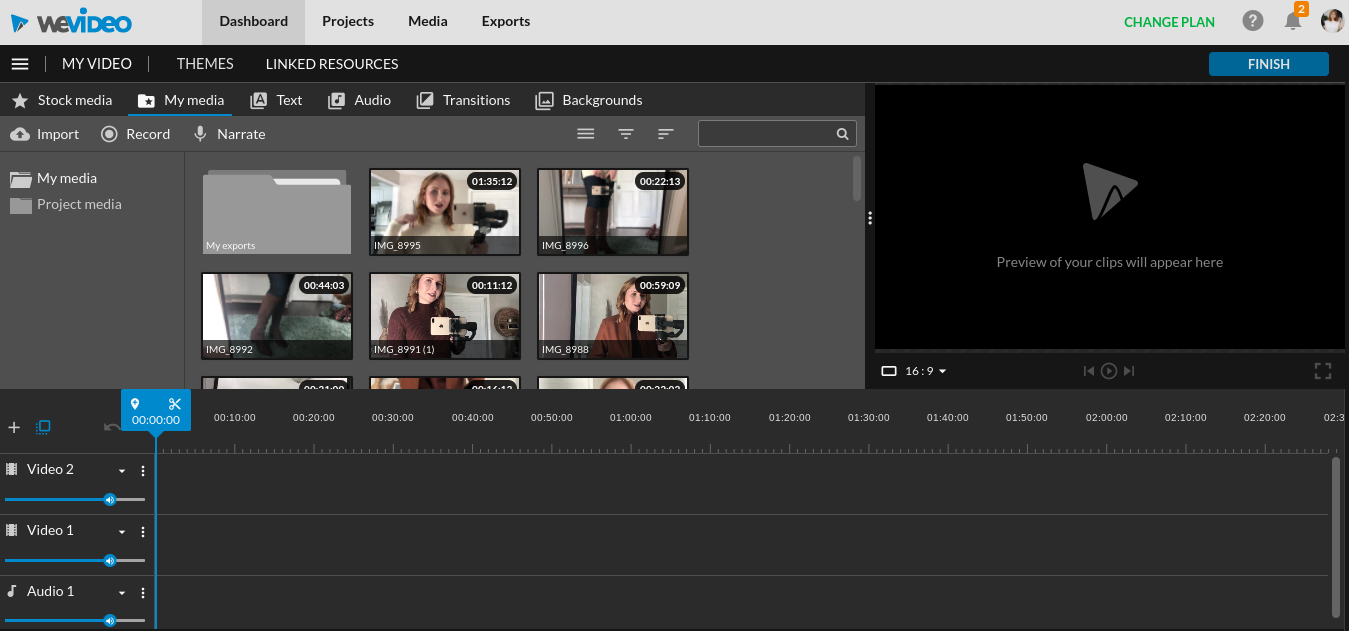
For my YouTube channel, I’ve been utilizing WeVideo to edit my footage. I have a Chromebook laptop so I needed to find the best video editing software for my computer. If you use a Mac book you can use iMovie. For the purpose of this guide, I will be discussing how I edit my footage using WeVideo because it’s the platform I’m most familiar with!
WeVideo makes it so simple to edit a YouTube video from scratch. I send my iPhone videos to my Google Drive and then import the files to WeVideo. WeVideo has transitions, text, free music, and more to help you create a beautiful and engaging YouTube video. Even as a total beginner I could navigate the WeVideo platform to edit my footage and mesh it all together.
Create a YouTube Channel From Scratch: How to Use WeVideo to Edit
Hit “create new project” and choose “video”. I create all of my YouTube videos in the 16:9 horizontal format which is ideal for YouTube. Once all of my clips are successfully imported, I play around with how each clip fits into my video.
Something I find helpful for my viewers is to include text popping up when I do an outfit change to describe what piece I’m wearing in the video. PRO TIP: Use the “scissors” tool on the blue slider to splice your video up into more sections if necessary!
This video editing platform offers various free audio clips that you can also add as background noise. I like to grab a song from their free music catalog and place it as “Audio 1” on my editing screen. I will typically take the volume way down to 5-7 so it can softly play in the background without overpowering my voice.
Once you’ve completed your video by adding in music, clips, transitions, text, and whatever else you want, hit finish on your project. WeVideo sends an e-mail with your finished video in a few minutes.
How to Upload Your First YouTube Video to Your YouTube Channel From Scratch
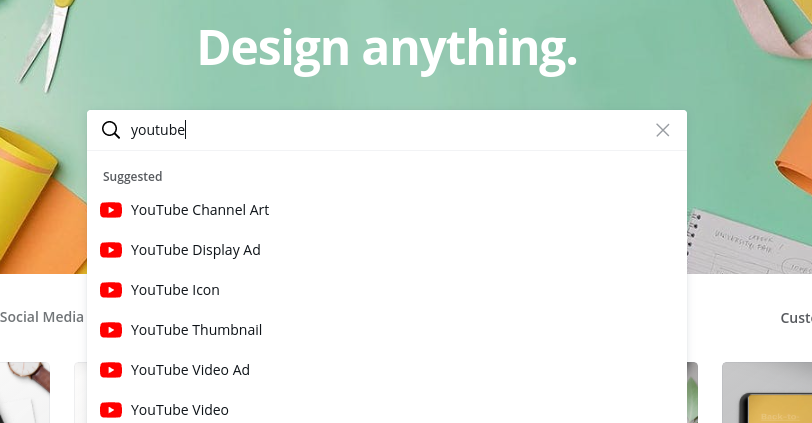
Create a Thumbnail in Canva
Why I Use Canva to Create Thumbnails
Not only do I love using Canva for my product collages, blog posts, and Instagram Story templates, but now I use it for creating eye-catching YouTube thumbnail art.
Side note: I pay monthly for the pro version of Canva as part of my business! It’s a $12/mo fee. I seriously use Canva every day so I find it a huge aspect of my business so I pay for the upgrades.
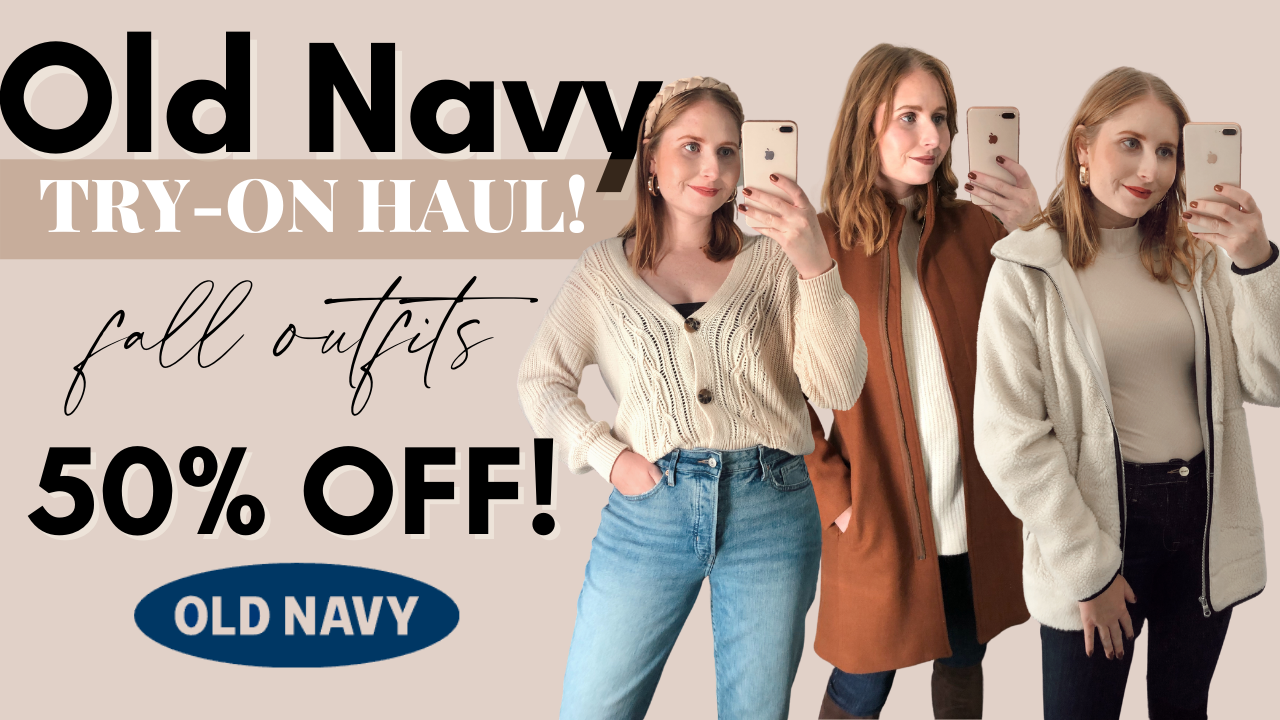
Since I am such a huge fan of creating graphics I felt a lot of creative freedom to design my own YouTube thumbnail art! Below is an example of a recent thumbnail I made for an Old Navy try-on video:
Tips for Creating an Eye-Catching YouTube Thumbnail
- Check out your competition! What types of thumbnails are popular for your niche?
- Stick to your branding colors when creating a thumbnail! You can see my background is my branding color, a light pink.
- Use large fonts to draw in attention. My favorite bold fonts are: Glacial Indifference, Playfair Display Black
- Add keywords to your thumbnail for Google searches. I have “Old Navy” and “Try-On Haul” as my keywords here.
- Download your thumbnail as a PNG file in the ideal 1280 x 720 thumbnail size
- Upload your new thumbnail image to your YouTube video
Upload Your First YouTube Video From Scratch to Your Channel
Once you’ve logged into your account, head to the upper right-hand corner where you’ll see the red video camera with the word “CREATE”. Click on “CREATE” to select your finished video to upload it to your channel.
What to Include in Your YouTube Video Descriptions
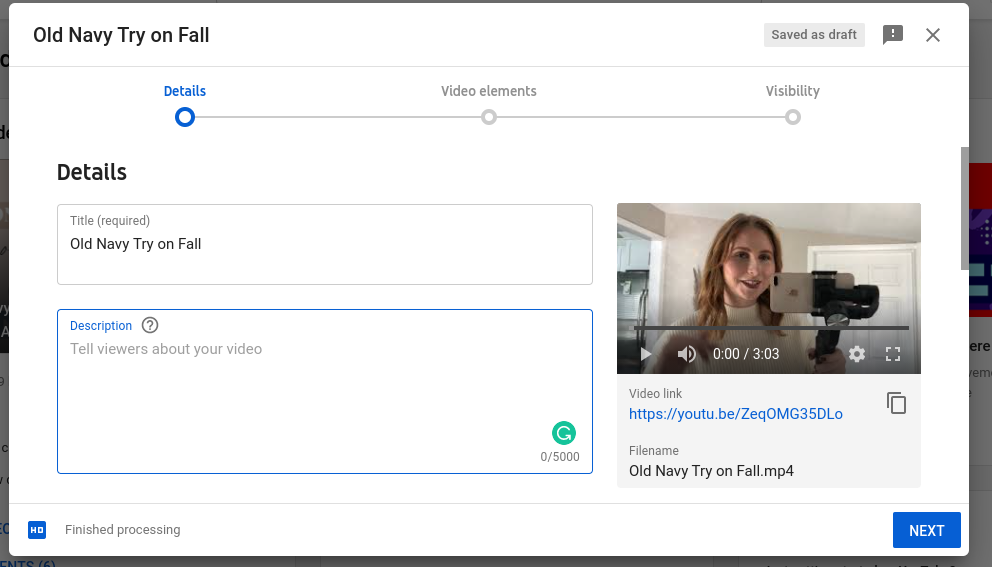
As soon as your video uploads you can start adding details to your video. Be sure to add a descriptive title to your video! For my own styling videos, I check to see what keywords are trending on Google for the retailer I am sharing.
For example, with my recent Old Navy video, I chose to title it “Old Navy Haul 2020 | OLD NAVY TRY-ON HAUL | Affordable by Amanda”.
My title looks great because it’s super specific and tells the viewer exactly what to expect as he or she watches my try-on haul featuring clothing from Old Navy. This title also has a searchable element to it because Google and YouTube will share my content with other people who are interested in watching Old Navy hauls.
In addition to a descriptive title, YouTube gives you the opportunity to write a longer description below. In the description area, I typically use affiliate links to share product information on each outfit I’m wearing in the video. By using affiliate links I can drive sales and make money sharing this video online! I also plug my social media platforms so viewers can find me elsewhere to follow along.
Other Factors to Consider Before Hitting Publish
- YouTube wants to know if your content is suitable for children or not, so be sure to check off the correct box.
- One other video element to consider including in your video? An end slide where you can highlight another similar video for the viewer to watch.
- At the end of your description, add a couple of relevant hashtags! For my Old Navy Try-On Haul, I included #oldnavy and #oldnavyhaul
Watch Examples of My First YouTube Videos
Thanks so much for reading how to start a YouTube channel from scratch today. Even though I only have a few uploads to my name, I wanted to go into detail describing everything from the gear I’m using to how I edit my videos to guide a beginner through the entire process.
Although starting a YouTube channel feels scary, I hope my guide encourages you to go for it anyway and just jump right in! I’m telling you all you need is a phone and a computer to get started today. Bookmark my guide as a reference when the time comes for you to finally upload your first YouTube video! Please subscribe to my YouTube channel as another way to connect with me!

The Comments
Nicole
Such great informative post! I find YouTube so overwhelming but loved the way you broke it down.
affordablebyamanda
NicoleSo glad I could help break it down easier! I am finding YouTube to be such an interesting new platform as I slowly navigate what type of content to post.
Thanks for stopping by!
Amanda
mahryska
i started my YT a few years ago unfortunately could not handle the amount of work. sad.
love from the sandpits of dubai..
http://www.mahryska.com
affordablebyamanda
mahryskaAw I can totally see it as an overwhelming platform! We’ll see where it takes me. I hope you might consider uploading again in the future, I’d love to see your content.
Amanda
Marlene
I’m starting one from scratch this year too, just subscribed to follow your journey!
affordablebyamanda
MarleneBest of luck! I am right there with you.
Amanda
Priya Sharma
Hi there! thanks for sharing this article with us, I am planning start my youtube channel and doing some self learning for it, I must say that this article is really a great help for me, pinning this article for share…..
affordablebyamanda
Priya SharmaSo glad you found this post helpful! Best of luck to your channel.
xo Amanda
How to Create Collages for Like To Know It - Affordable by Amanda
[…] “Blogging Tips” category here on the blog tackles everything from YouTube Growth Strategies to Pitching Brands. I’ve had over 8 years of experience in the blogging and influencer […]